You may want to set a Callback Date as part of the disposition of a call. turboDial provides direct access to allow you to set a Callback Date field in the Keap Contact Record. The Callback Date feature in turboDial provides these capabilities:
- The date is saved in the Keap Contact record where it can be viewed, and Keap Contact Searches can be filtered based on the date.
- The date is displayed and can be modified in the turboDial panel.
- When the date is saved for a Contact and that date is in the future, turboDial will attempt to trigger an API Goal in your Keap account. You can optionally setup automation to be performed when that goal is triggered. That automation could include steps to proactively inform one of your Users that the call back is due.
Automation is not triggered for Callback Dates set in the past. - If you clear the Callback Date in turboDial before saving it then the date field will also be cleared on the Contact Record.
Setup Overview
There are 2 primary steps an Admin user must follow to enable the Callback Date feature:
- Create a Contact Custom field where the Callback date will be saved.
- Configure your turboDial Global Options to allow the Callback date to be modified and saved in turboDial.
Read the following sections for full instructions.
1. Create the Callback Date Custom Field
To enable the Callback Date feature in turboDial you must create a Contact Custom field in your Keap account. It must have the name “Callback Date” and the field type must be ‘Date/Time‘.
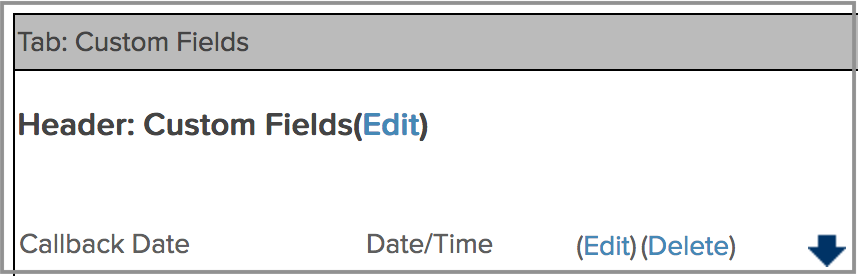 This custom field must be added at Keap->Admin->Settings page of your Keap account in the Contact context. And it must be named exactly as shown here (capitalization is critical).
NOTE: other custom fields you have created for use with turboDial have been for the Task/Appt/Note record. However, in this case the custom field is for the Contact record.
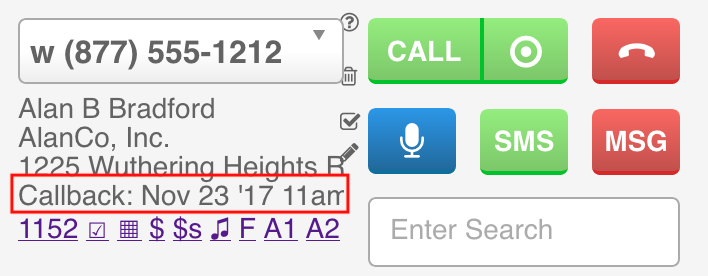
Once that field exists in Keap turboDial will automatically find it and display it in the Contact Information area on the turboDial panel, as shown here:
2. Configure turboDial Global Options
There are two methods for modifying and saving the Callback date. Both methods involve modifying your Global Options in turboDial.
Method 1: Update Contact Info button
Change your Global Options to set the “Users can Update Contacts?” option to On. When that option is On you will see this pencil button in the Contact Information area of turboDial:

Clicking that pencil button will open the window for modifying the Contact’s information, and one of the fields available to change will be the Callback Date, as shown here:
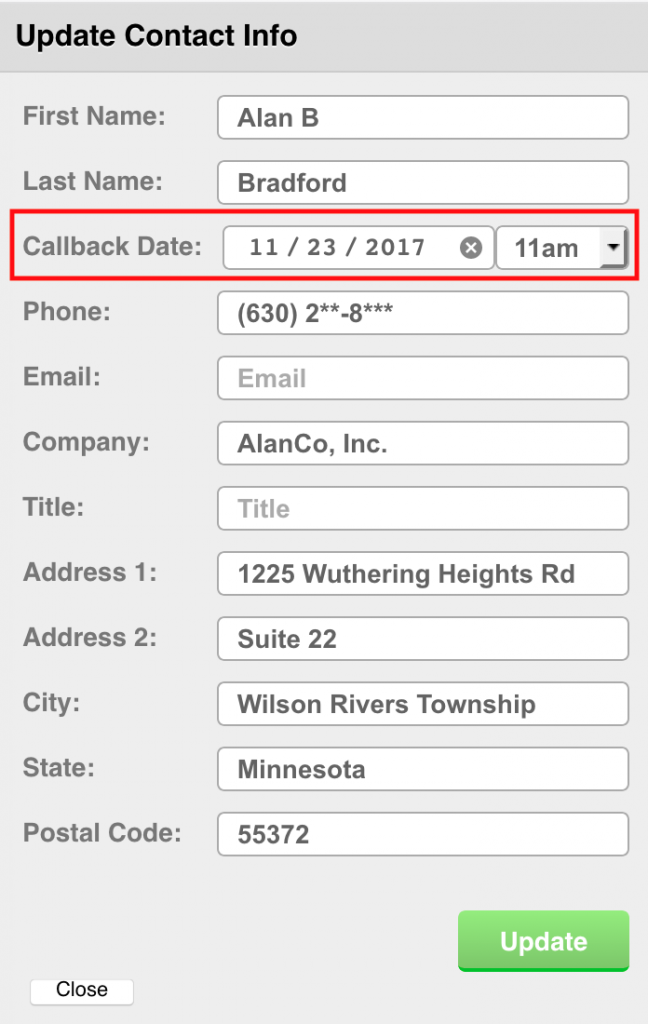
When you click the “Update” button the Callback Date will be saved and the API Goal will be triggered in your Keap campaign.
Method 2: Disable Add & Remove Tags
Change your Global Options to set the “Enable Add & Remove Tags?” option to Off. When that option is Off and you have also created the Callback Date custom field, then you will see the following in the Call Outcome area of turboDial:
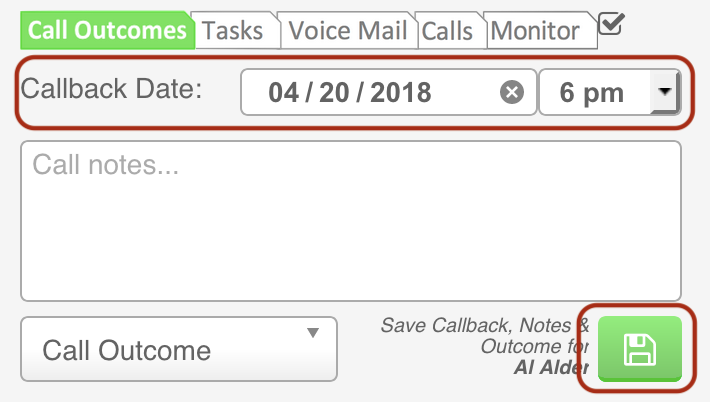
You then have access to modify the Callback Date and Time, and when you click the Save button those values will be saved in the Contact Record custom field and the API Goal will be triggered in your Keap campaign.
Using the Callback Date in Keap
When you have the Callback Date populated for your Contacts you can use it in Keap wherever dates are referenced. For example:
- You can create a Saved Search of Contacts and filter the search by specifying a date range in the Callback Date field. That Saved Search could then be used in turboDial to direct your calling agents to place calls to the Contact’s whose Callback Date has come due.
- You can set a Field Timer in a Campaign Builder sequence to wait until the Callback Date & Time and then proceed with some action. Read the next section for more details on this.
Keap Automation to Trigger Callback Notification
When you save a Callback date with turboDial, and if that date is in the future, then an API Goal will be triggered for the Contact. You can use that goal to trigger Keap automation for any purpose.
An example of a good purpose is to trigger a notification at the time the Callback is due. For the notification you might send an email to a User in your team, or assign a task, or anything else that fits your business.
In the example below the notification is accomplished with a Hot Lead Alert sent to the turboDial panel of a User.
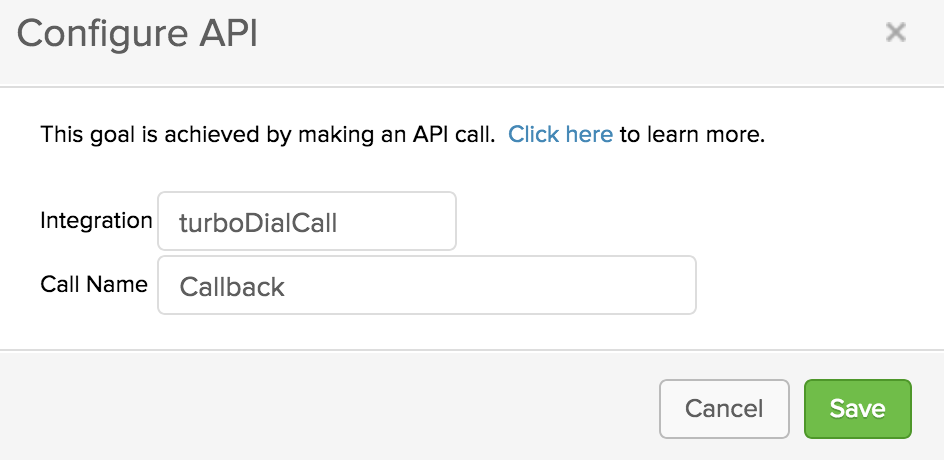
The internal configuration of the API Goal is:
Integration: turboDialCall
Call Name: Callback
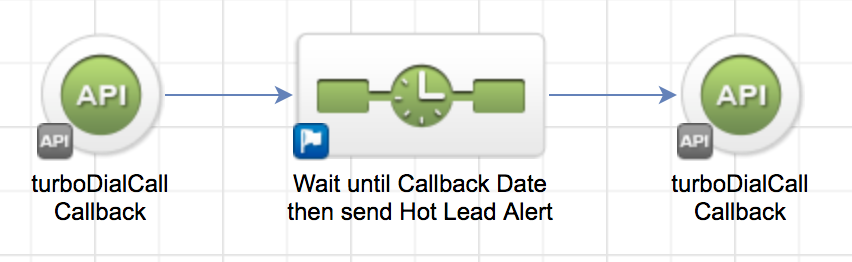
Here’s an example campaign that will send a Hot Lead Alert to a User when a Callback comes due.
The Campaign looks like this:
 The internal configuration of both API Goals looks like this:
The API Goal is placed both at the beginning and at the end of the sequence. With that approach if the Contact is currently waiting in the sequence it will be cancelled and started over. Therefore, only the most recently set Callback date will be in effect.
It is not possible to have multiple Callback dates in effect for a specific Contact.
Please Read: After you add or change an API Goal in your Keap Campaign Builder you must inform turboDial to look for it by clicking the Reset Disabled Goals button in your turboDial Management Account.
The campaign sequence looks like this inside:
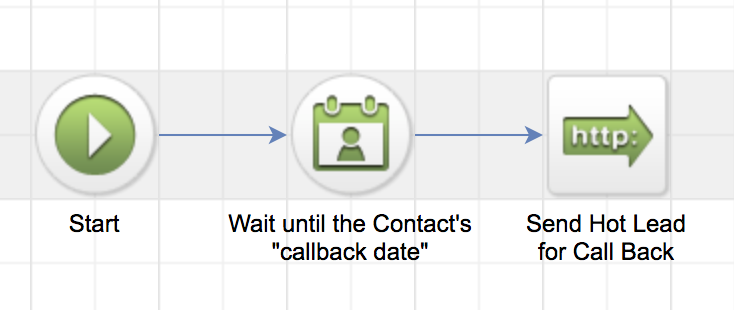 The sequence begins with a “Field Timer” that waits until the date and time set in the Callback date.
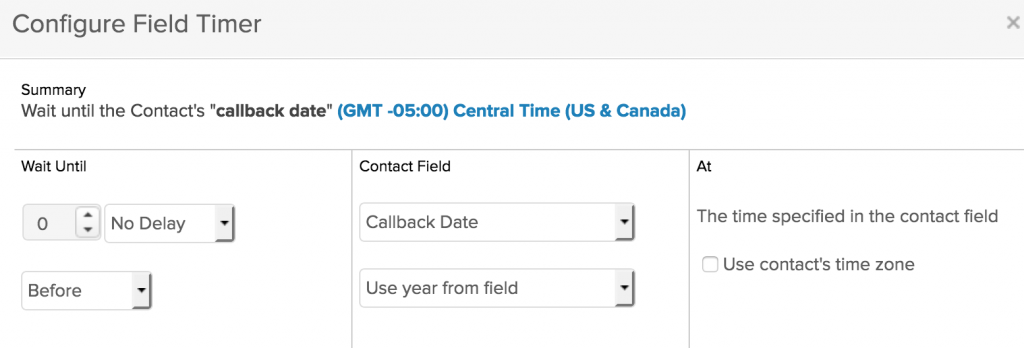
The Field Timer looks like this inside:
 With that configuration the timer will wait until the date and time set in the Callback Date field, and then proceed to the following automation elements – in this case the automation will send an HTTP POST to turboDial for a Hot Lead Alert.
Note that the time in the Callback Date and Time field is saved and displayed with no timezone assumed. But when controlling automation flow with a Field Timer Keap automation will assume the custom field uses the timezone set up in the settings of the Keap account. So, for example, if you save a Callback Date of March 15, 2025 at 10:00 AM then the automation will run on that day at 10:00 AM for the timezone of the Keap account. If you instead check the “Use contact’s time zone” box then the automation will run on that day at 10:00 AM for the timezone set in the contact record.
You should establish a convention in your team to save Callback Dates and Times using the timezone that is set in your Keap account.
Keap Calendar Appointment
If you use the Keap calendar then you may want to include the creation of an appointment as part of your Callback Date automation. To do that you will add the “Create Appointment” process to the sequence.
In the “Which Date?” field you will select the Callback Date custom field.
In the “Schedule this Appointment” field you will select “the year in the field” and the “Use the time in the custom field” values.
With that appointment automation your Keap calendar will display an appointment for each Callback Date, and you can receive an email notification when the appointment is created and use the calendar link in that email to add the appointment to your personal calendar.
(To help search for this document the term callback date can also be spelled call back date )