Teams with multiple turboDial Users that frequently transfer calls between and communicate between each other will find that the Team Status Panel provides a consolidated view of your full team in one place.
The Team Status Panel displays a list of online User presence and availability. It also lets each User choose their preferred device for receiving transferred calls, and control their availability status.
Enabling the Feature:
The Team Status Panel is only available to users with the Hosted Voice add-on.
It is enabled in the Global Options by setting Enable Team Status Panel? to ON, clicking the Update button, then exiting and launching turboDial.
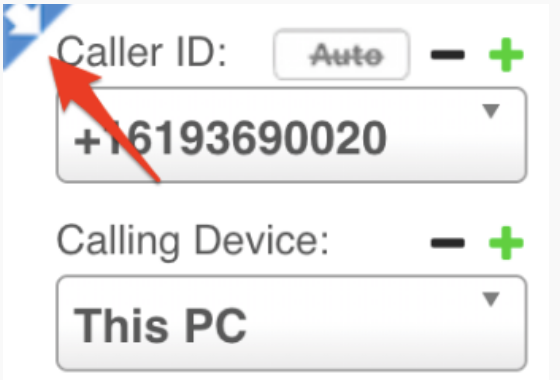
Once enabled, the Team Status Panel can be viewed or hidden by clicking the arrow to the immediate left of Caller ID:
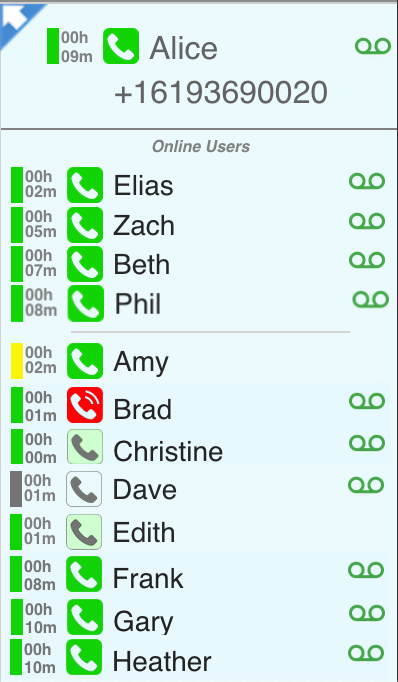
Overview: Team Status Panel
Then Team Status Panel is divided into three sections:
1 – Logged-in User’s Status: Allows the logged-in user to set their Nickname and Reach Number.
2 – Pinned-users list: users in the pinned-users list are put above a small divider separating them from non-pinned users. Pinned users are ordered bottom to top, bottommost being first added, topmost most recently added. Users are pinned by clicking on and holding down the click until you hear a beep and see their info appear in the Pinned-users list.
3 – Non-pinned users: alphabetically sorted list of the remaining currently online users.
Logged-in User’s Status Section
The Logged-in User’s Status section has several elements associated with the user logged-in to this turboDial panel, and some of elements are configurable. The following list describes each element.
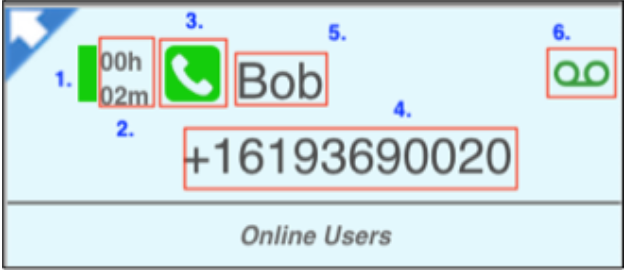
1- Presence Indicator
Bright green (active user): indicates you have interacted with the turboDial panel within the last five minutes.
Yellow (inactive user): indicates you have not interacted with the turboDial panel for at least five minutes.
Gray: indicates you have enabled Do Not Disturb mode. Your presence information is not displayed to other users when you are in Do Not Disturb mode.
The Presence Indicator is not perfectly reliable in determining if a User is active at their PC. Browsers are not perfect in recording mouse movements, and devices such as “mouse shakers” can also be used to appear active when away from the PC.
2 – Activity Timer:
Activity Timer starts or resets to “zero” when:
– Your presence changes from Inactive to Active or Active to Inactive
– You begin or end calls.
3 – Phone Type:
The color of this icon indicate whether your Reach Number is a hard or softphone and if your status is in Do Not Disturb mode. Also, if the phone is a softphone the icon will indicate if you are on a call,
Light green: hardphone – whether busy or not busy is unknown
Bright green: softphone – not busy
Red: softphone – busy
Gray: Do Not Disturb
Users can set or remove themselves from Do Not Disturb by clicking their Presence Indicator.
When a user is in Do Not Disturb, you:
• Cannot select their Reach Number to perform a XFR or ICOM
• Can XFR and ICOM their voice mail if their Reach Number is Voice Mail enabled.
4 – Reach Number:
The number called when a call is transferred to you or another user calls you using ICOM (Intercom)
5 – Nickname:
Your user-list label (usually set to be your name). It defaults to your email address. You will be viewed on other users’ Team Status Panels with this nickname.
6 – Voice Mail Availability Indicator:
This icon appears if you have voice mail setup for your current Reach Number. If you don’t, it won’t appear.
Set Your Reach Number:
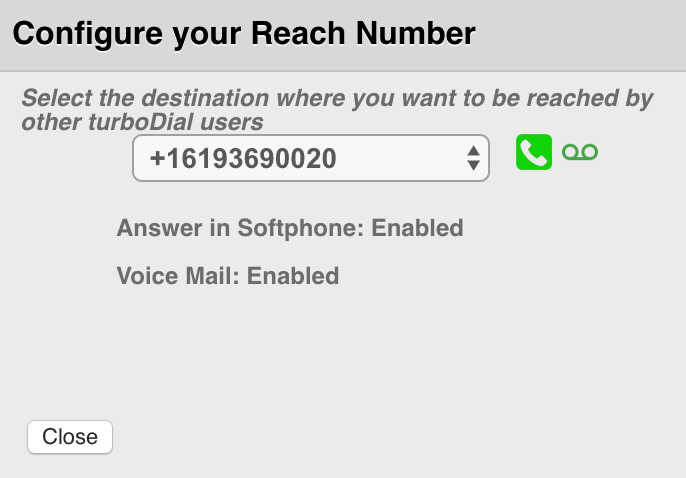
Click your current Reach Number. In the resulting dropdown, choose a number from the selector, and click “Close” when done.
When setting a Reach Number, consider whether you want it softphone enabled and/or voice mail enabled.
NOTE: If you do not have a softphone-enabled Reach Number, other users cannot tell whether you’re available to receive call transfers or ICOM calls.
Reach Number Considerations
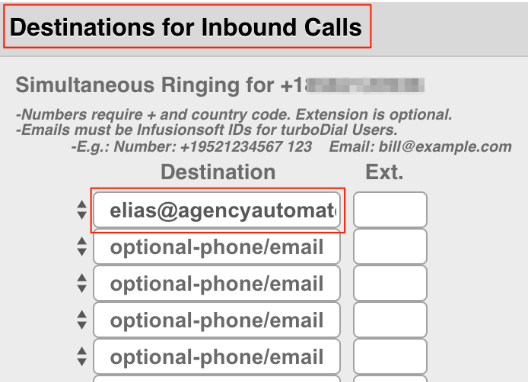
Softphone enabled: This means that the Destination for Inbound Calls settings for your Reach Number is set to ring your turboDial softphone: (see Enhanced Inbound setup guide)
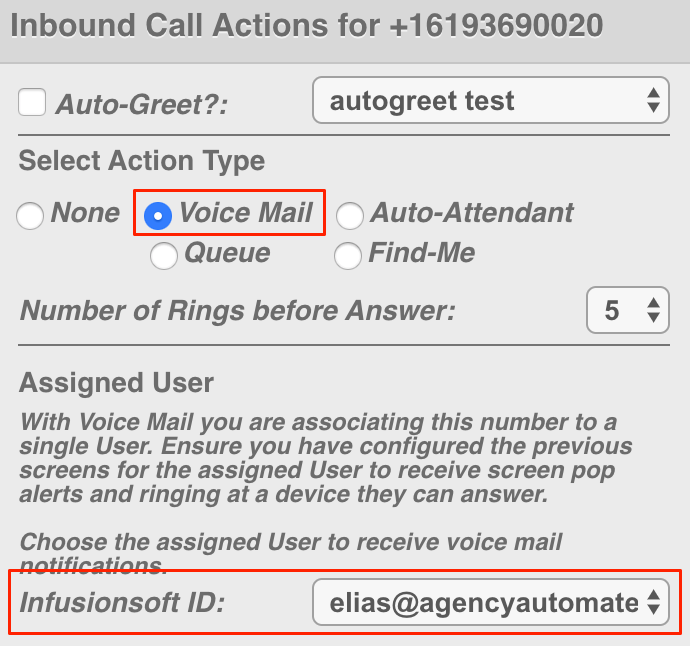
Voice Mail enabled: Your Reach Number must be Voice Mail enabled if you want other users to be able to transfer calls to your Voice Mail. You can enable Voice Mail by editing the Inbound Call Actions settings for your Reach Number:
Set Your “Nickname”:
Click the current Nickname value. That allows you to edit it. To save it, click on part of the turboDial panel outside of the Nickname field.
Viewing the Status of Other Users and Transferring Calls to Them
You can easily view the status of other users by opening the Team Status Panel. Statuses are color coded, and meanings according to each color are in the Legend.
If you need to transfer a call to a user or their voice mail, or make an Intercom call, you can do that via the Team Status Panel
For any user you’d like to perform one of the above actions for, click their phone/nickname or voice mail icon in the Team Status Panel. Doing so selects and highlights their nickname or voice mail icon unless it was already selected—if you click the phone/nickname or voice mail icon for an already-selected user, it deselects them.
Transfer To Reach Number:
To transfer your call to another user, click on the user’s phone icon or nickname to select them and then click XFR button. Your call will immediately begin ringing the reach of the user, and you will be disconnected.
Transfer To Voicemail:
To transfer your call to another user’s voice mail, click on the user’s voice mail icon to select it and then click XFR button. Your call will be immediately answered with the user’s voice mail greeting, and you will be disconnected.
If users are offline but have voicemail-enabled numbers, their names will still appear (with a – to the left of their names), and calls can still be transferred to their voicemails per usual:

Only Admins can hover over a team member’s name to see which Contact they’re viewing:
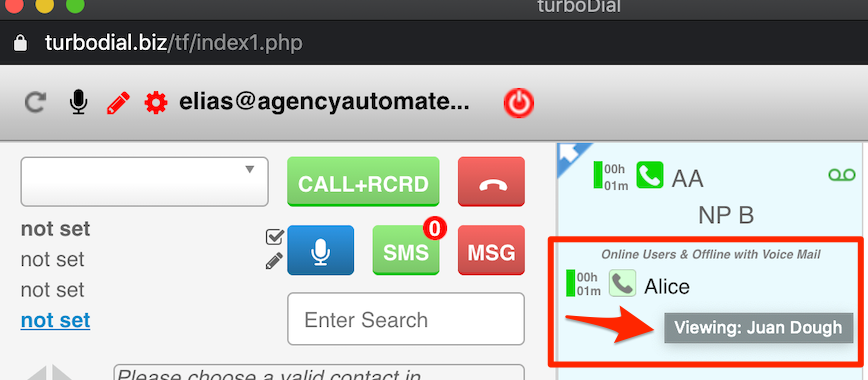
NOTE: Who a team member is viewing doesn’t necessarily mean that’s who they’re talking to: They could be talking to Contact A, but viewing User B.
Limit Team Status Display to Same Department
A Global Option setting can be set to Limit each User’s Team Status Panel to display only other Users who have the same assigned Department.
When this option is enabled the following rules will be applied for each User’s panel:
- If the User has an assigned Department then their Team Status Panel will display other Users with the same assigned Department AND other Users with no assigned Department. Users with a different assigned Department will not be displayed.
- If the User has no assigned Department then their Team Status Panel will display all other Users.