The List Dialing feature allows you to load an Keap Saved Search of Contacts or Opportunities into the turboDial app to save significant time as you make your calls. With List Dialing you can work completely within the turboDial app rather than switching between turboDial and Keap.
List Dialing supports Contact and Opportunity Saved Searches.
Saved Reports are not supported, nor are Saved Searches for Companies, Orders, Tasks, Subscriptions, Orders or Referral Partners.
If your data is only available in a Saved Report then see the guide section titled “List Dialing for Saved Reports” for a solution on how to use List Dialing for your situation.
Loading an External List
It is not possible to load a list into turboDial from any source other than Saved Searches in Keap. So, for example, you cannot load your excel .csv file directly into turboDial. Instead, import it into Keap and create a Saved Search in Keap for that list. Then after you have re-launched turboDial that list will appear in the List Dialing selector and you can load it into turboDial.
Configure List Dialing
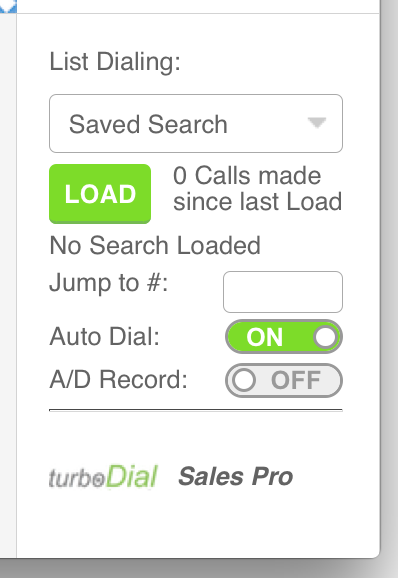
The List Dialing controls appear in the bottom-right quadrant of the turboDial panel, formerly occupied by the dial-pad. The steps to activate List Dialing are:
- Choose a Saved Search from the selector. All of your Contact Saved Searches and Opportunity Saved Searches in Keap will appear in the selector. You can quickly find the specific list you want by typing a portion of its name in the selector window.
- Press the Load button. The number of contacts in the list will be displayed and a pair of Right-Left arrows will be enabled in the contact dialing quadrant. Note, if the Saved Search was created without the Contact ID field the list will not load. You will need to modify the Saved Search in Keap to add the Contact ID field.
To unload the current list choose the “Saved Search” label at the top of the selector and then press the Load button.
The ID Column is Required
When you create a Saved Search in Keap you will not be able to load that list into turboDial if the Saved Search does not include the Contact ID column. When you setup the Saved Search you can configure the “columns” that are visible in the Saved Search listing, and those columns must include the Contact ID or it will not be loadable in turboDial.
All you need to do is view the Saved Search in Keap, click the “Edit Criteria/Columns…” button and in the window that appears choose the Columns tab. In that tab you can find the ID field on the right side and move it the left side. Then click the “Save” button to save your modifications.
Ordering the List
When turboDial loads in your Saved Search from Keap, Keap provides that list with the Contacts in the order you have specified when you setup the Saved Search.
There are random exceptions where Keap provides the Contacts in an unspecified order. turboDial cannot modify the order of Contacts received from Keap.
Here’s an example for how you would setup your Saved Search list if you want the Contacts to appear with the newest Contacts first in the list:
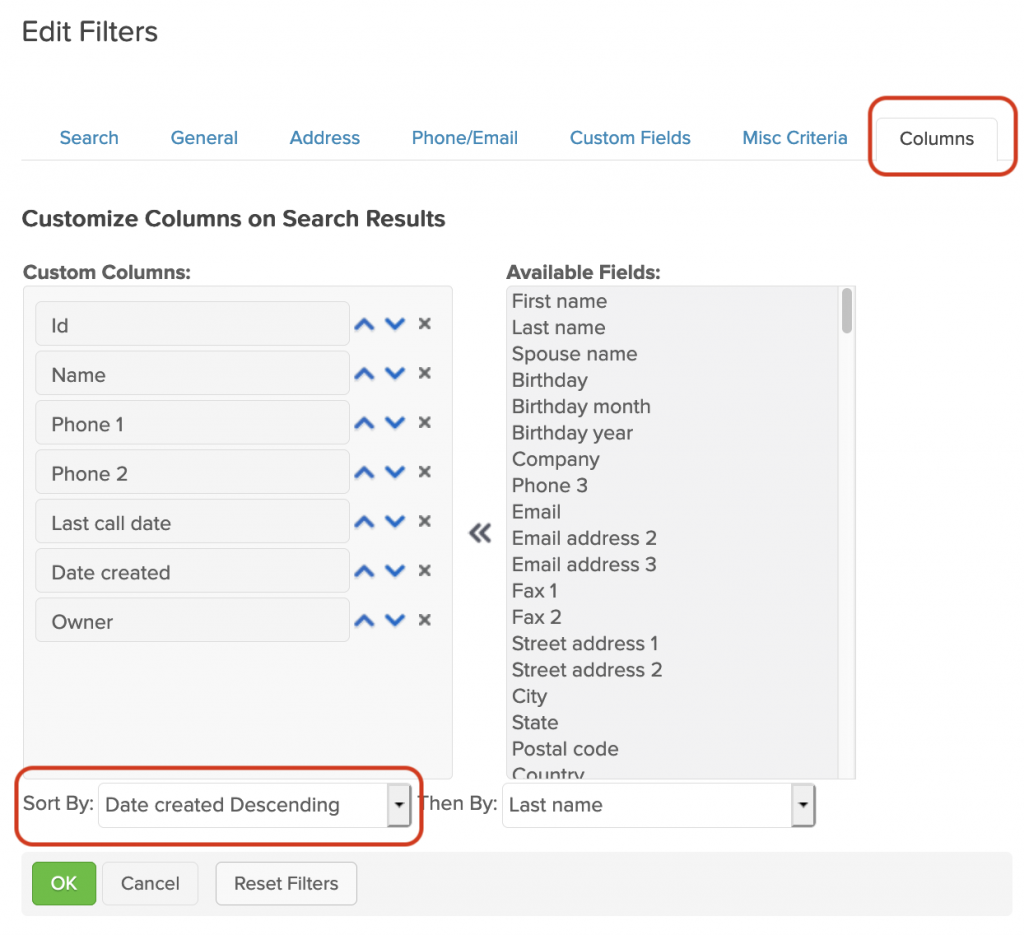
Note that you must save the Saved Search after making any changes or else the changes will not be included when the list is loaded into turboDial.
Navigating a List
When a list is loaded a pair of Right-Left arrow buttons will be enabled in the contact dialing quadrant. After loading a list press the right arrow to move to the first contact in the list. From that point you can move forward or backward in the list with these arrows.
You can also jump directly to a position in the list by entering the position index in the “Jump to #:” field and pressing the Enter key.
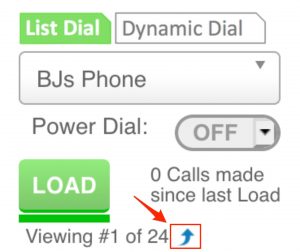
Viewing Contacts on a List from Within turboDial
There is a blue up-arrow icon you can click to see the Contacts on the list loaded:
Enable Auto Dial
When Auto Dial is enabled turboDial will automatically transition to the next contact in the list and dial their number, and that transition will occur immediately after you save a Note or Call Outcome after a call. To enable Auto Dialing move the switch to On; move it to Off to disable it. Note – the first call after loading a list must be started manually, and subsequent calls will be Auto Dialed.
Auto Dial will stop if the last call placed was to the contact at the end of the list.
You can also place calls manually when this feature is enabled, by pressing the Call button. For example, if an Auto Dialed call did not succeed and the contact has an additional phone number available you can choose that number in the Phone Number selector and press the Call button to dial it. Then once you have completed your attempts to reach the contact you can save a Note or Call Outcome and the Auto Dial feature will resume and automatically call the next contact.
Enable Auto Dial Recording
When the A/D Recording switch is set to On calls automatically dialed by the the Auto Dial feature will be recorded.
Note, this switch has no effect on calls you make manually. If the Auto Dial switch and A/D Recording switch are both “On” and you make a call by pressing the “Call” button the call will not be recorded. Press the “Call & Record” button if you want the call to be recorded.
No List Sharing
This standard List Dialing feature does not include any methods to allow multiple Users in your team to share a single Saved Search list. If multiple Users load the same Saved Search list for dialing in turboDial they will collide by calling the same Contacts. You should take care to ensure your Users are dialing in Saved Searches that do not contain the same Contacts.
If you need to have multiple Users dialing into the same Saved Search list then you should use the Volume Dialing add-on, or you can enable the “Restrict views to owned records” setting in the Global Options (see below).
Restricting to Owned Contacts
There are three options for Loading a Saved Search such that only Contacts who are owned by the User will be loaded into turboDial.
Global Option: If you enable the “Restrict views to owned records” setting in the Global Options then when a User loads a Saved Search list in turboDial only the Contacts who are owned by the User will be loaded. In this manner each User in your team who loads the same list will actually be loading a different set of Contacts. With that technique you can use this setting to allow multiple Users in your team to safely dial to the same Saved Search list without colliding.
Since this is a Global Option in turboDial it will apply to all Saved Searches.
^r Suffix on Saved Search Name: If you add the characters ^r to the end of the name of your Saved Search in Keap then when a User loads a Saved Search list in turboDial only the Contacts who are owned by the User will be loaded. In this manner each User in your team who loads the same list will actually be loading a different set of Contacts. With that technique you can use this setting to allow multiple Users in your team to safely dial to the same Saved Search list without colliding.
This technique will apply only to Saved Searches with the ^r appended to the name.
Search Filter: When you setup a Saved Search in Keap you have access to an “Owner ID” filter on the “Misc Criteria” tab. One of the options under Owner ID is “Current User”. If you select that option then when a User in your turboDial account loads the list only the Contacts owned by that User will be loaded into turboDial.
This setting will apply only to the Saved Searches where you have included it.
Restricting the Saved Searches Available in turboDial
There are two different methods for restricting the Saved Searches that will appear and be available in the Saved Search selector in turboDial. These methods can be used together or individually.
Restrict Saved Searches Available to All Users: If you have a large number of Saved Searches in your Keap account you may wish to limit the number that is displayed and available to use in turboDial. There is a naming convention for your Saved Searches that will allow you to do that:
If any Saved Search in Keap (Contact Search or Opportunity Search) is given a name that begins with a prefix of td:: or ends with a suffix of ::td then turboDial will only display the Saved Searches from your Keap account that are named with the td:: prefix or ::td suffix.
Examples: td::Hot Leads or Hot Leads::td
With that naming convention you can choose the Saved Searches from your Keap account that you want available in turboDial, and rename them to begin with td:: or end with ::td. Once you do that and re-launch turboDial then only those Saved Searches will show up in turboDial, minus their td:: prefixes and ::td suffixes.
Restrict Saved Searches Available to Specific Users: In Keap you may “share” a Saved Search with specific users. If the “Access Only Shared Saved Searches” Global Option is enabled in turboDial it will cause turboDial to honor those sharing choices, and each turboDial user will see only the Saved Searches that have been shared with him/her.
Caution: Users Must Have Permission to View Contact Records
If a User in your Keap account has no permission to view Contact Records then that User will be unable to load a Saved Search list in turboDial. However, as long as the “Restrict views to owned records” setting in Global Options is set to Off, the User will be able to dial a list that has been loaded by another User for Power Dial or Dynamic Dial.
Restrict Saved Searches Available by Department Assignment: Please refer to this article.