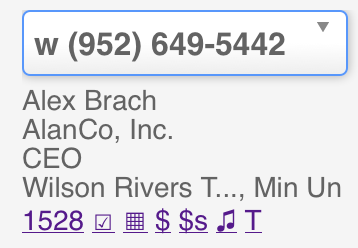
The upper left quadrant of the turboDial panel is where you find the Contact’s information, including the phone number selector, name, title, company and address information.
At that bottom of that information is a row of clickable links that can be clicked to open new windows, as follows:
- A number: the contact record in a new window
- A check mark symbol: a window to create a new task
- A grid symbol: a window to create a new appointment
- A dollar sign: a window to create a new opportunity
- A plural dollar sign: a window to view the contact’s current opportunities
- A pair of musical notes or the letter N: a window to view the contact’s current notes
Here’s an example of the Quick Links:

IMPORTANT: If you’d ever like to hide (or show) any of the Quick Links, that is done by by setting each Quick Link’s respective Global Option to OFF (or ON). To learn more about those permissions, click here then scroll down to the Quick Links section.
Custom Quick Link
In the example shown above there is one more link at the end of the row: in this case it’s the letter T. This last link is a custom link that can be optionally displayed with each contact.
The purpose of the custom link is to give you quick access to a link of your choosing with portions of the link automatically filled-in by turboDial using information unique to the contact and the logged-in User.
Install Custom Quick Links: User Record Street Address 2 Field
turboDial creates the custom link using instructions you provide in the Street Address 2 field of the User record in Keap.
Note, this is the User record in the Admin->Users section of Keap. It is not a Contact record. You must provide the custom quick link configuration in the Keap User record for every turboDial user you want to have access to this feature.
The Street Address 2 field is re-purposed to be used in creating the custom link since it is the User record link available to turboDial that is least likely to be needed for other purposes. However, the field can contain a maximum of 74 characters, so you must limit your custom quick link configuration accordingly.
The sections below show you how to create an instruction that you can then install in the User record (Street Address 2 field) of any User in the Admin->Users section of your Keap account.
Two Types of Custom Links
There are two different types of links you can configure:
- Link to specific pages based on keyword. These include: an Internal Form in your Keap Account, a Timetrade booking link, or an AppointmentCore booking link
- Link to any web page
You cannot mix type 1 Keyword links and type 2 Web Page links in the Street Address 2 field.
Read on for the instructions for each type.
1. Link to Specific Pages based on Keyword
Here’s an example of custom link instructions that when saved in the User record Street Address 2 field will provide a quick link to open a specific Internal Form in Keap:
Keap Internal Form: Keyword is formId
Here’s the instruction you will install in the User Record (Street Address 2 field):
F:formId=266 (note that the ‘I’ in formId is capitalized)
Let’s dissect that instruction:
- F:
This is the label for the link you want to appear at the end of the Quick Links in the turboDial panel, and it is followed by a colon.
In this case the link will appear as the letter F. You could also use a different letter or multiple letters. - formId=266
This specifies the specific Internal Form to be opened is the form with ID # 266. Read below to learn how to find the form ID for an Internal Form.
Note that when the Internal Form is opened this way it is displayed as an “Add Contact” page, but the contact information is already correctly filled in to match the contact that turboDial is focused on. You can ignore the Add Contact header.
To find the ID number for the Internal Form follow these steps:
- Log in to your Keap account
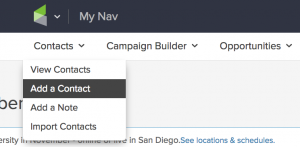
- In the top Keap menu choose the “Add a Contact” option under Contact.

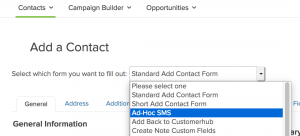
- In the Add a Contact page that opens, use the drop-down selector to choose the Internal Form you want to be able to open from turboDial.

- Once you have chosen the Internal Form, look in the address bar of your browser, and find the Internal Form ID number at the end of the address there:
 In the example shown in the image, the Internal Form ID is 301
Timetrade Booking Link: Keyword = ttrade
Here’s the instruction you will install in the User Record (Street Address 2 field):
T:ttrade=ZQYSN
Let’s dissect that instruction:
- T:
This is the label for the link you want to appear at the end of the Quick Links in the turboDial panel, and it is followed by a colon.
In this case the link will appear as the letter T. You could also use a different letter or multiple letters. - ttrade=ZQYSN
This specifies Timetrade Activity code for the appointment type you have created in Timetrade. Read this page for more details from Timetrade.
turboDial will create a Timetrade link that pre-fills these fields in Timetrade: First Name, Last Name, Phone, Email Address, Company.
AppointmentCore Booking Link: Keyword = acore
Here’s the instruction you will install in the User Record (Street Address 2 field):
A:acore=abPUUJPK
Let’s dissect that instruction:
- A:
This is the label for the link you want to appear at the end of the Quick Links in the turboDial panel, and it is followed by a colon.
In this case the link will appear as the letter A. You could also use a different letter or multiple letters. - acore=abPUUJPK
This specifies the AppointmentCore appointment type code you can find when you create an appointment type and get the booking URL.
turboDial will create an AppointmentCore link that includes the Keap Contact ID so that the AppointmentCore booking page will be pre-set to the intended contact.
AppointmentCore Multiservice Booking Link: Keyword = acorm
Here’s the instruction you will install in the User Record (Street Address 2 field):
A:acorm=abPUUJPK
Let’s dissect that instruction:
- A:
This is the label for the link you want to appear at the end of the Quick Links in the turboDial panel, and it is followed by a colon.
In this case the link will appear as the letter A. You could also use a different letter or multiple letters. - acorm=abPUUJPK
This specifies the AppointmentCore Multiservice appointment type code you can find when you create an appointment type and get the booking URL.
turboDial will create an AppointmentCore Multiservice link that includes the Keap Contact ID so that the AppointmentCore Multiservice booking page will be pre-set to the intended contact.
Multiple Keyword Type Quick Links
For the these Keyword type Quick Links you can create multiple different links and have them all appear in the Quick Link row in turboDial. Use the vertical bar character on your keyboard to separate them in the Street Address 2 field as shown here:
Here’s an example Multiple Keyword instruction that could be installed in the User Record (Street Address 2 field):
T:ttrade=ZQYSN|F:formId=126|A:acore=abPUUJPK
The vertical bar character is typically found on the back-slash key.
You should have space for about 5 Keyword type links within the 74 character limit of the Street Address 2 field, if you use 1 character labels for each link. If you create more than about 4 Keyword type links then you may find your links are hidden off the right edge of the Contact Info section in turboDial. However you can use 2 fingers on your trackpad to scroll the information to the left and access the remaining links.
You cannot mix type 1 Keyword links and type 2 Web Page links in the Street Address 2 field.
2. Link to a Web Page
Here’s an example of custom link instructions that when saved in the User record Street Address 2 field will provide a quick link to creating an appointment in Timetrade with the first name and email address of the Contact pre-filled:
T:https://www.timetrade.com/book/ZQYSN?firstname=<fn>&email=<em>
Let’s dissect that instruction:
- T:
This is the label for the link you want to appear at the end of the Quick Links in the turboDial panel, and it is followed by a colon.
In the example the link appears as the letter T. You could also use a different letter or multiple letters but be aware that the total number of characters allowed in the Street Address 2 field is 66, so make your label as short as possible. - https://www.timetrade.com/book/ZQYSN
This is the booking link for a specific appointment type the User has previously setup in Timetrade. - ?firstname=
Timetrade allows the first name to be pre-filled by adding ‘firstname=’ to the booking link. - <fn>
turboDial will replace this code with the actual first name of the contact. - &email=
Timetrade allows the email address to be pre-filled by adding ’email=’ to the booking link. - <em>
turboDial will replace this code with the actual email address of the contact.
So when turboDial is done processing the link it shows up in the Quick Links as a ‘T’ and the actual link looks something like this:
https://www.timetrade.com/book/ZQYSN?firstname=Alex&email=alexb@timefusionbiz
You may not include multiple Web Page Links in the Street Address 2 field.
Web Page Link – Substitution Codes
You can use the following codes as you create your Web Page Custom Link instruction in the Street Address 2 field:
- <cid> – the contact ID
- <em> – the contact’s email address
- <fn> – the contact first name
- <ln> – the contact last name
- <ph> – the contact phone
- <comp> – the contact’s company
- <uid> – the User’s ID
You cannot mix type 1 Keyword links and type 2 Web Page links in the Street Address 2 field.
